Friday, June 26, 2020


Sunday, June 21, 2020
Wednesday, June 17, 2020
Saturday, June 13, 2020
Friday, June 5, 2020
Thursday, June 4, 2020
Wednesday, June 3, 2020
Thursday, August 22, 2019
1000 YouTube Subscribers Free - Awesome

Subscribe to Channel SRI TV https://www.youtube.com/channel/UC_Dpn-oorc8CMobK0IwGjHQ?sub_confirmation=1.
https://www.youtube.com/watch?v=IZ4wcYfFEjE
Wednesday, August 21, 2019

Tuesday, August 20, 2019
Hey Guys !!!! Work with me. Just Only for Guys
Go to :
https://www.youtube.com/watch?v=oabACBJWXMU&t=68s
Just Visit :
https://www.youtube.com/watch?v=ZxDGJJy1QtA
Before that :
https://www.youtube.com/watch?v=j2y-3zmoAn0
Now On Youtube :
https://www.youtube.com/channel/UC_Dpn-oorc8CMobK0IwGjHQ
https://www.youtube.com/watch?v=oabACBJWXMU&t=68s
Just Visit :
https://www.youtube.com/watch?v=ZxDGJJy1QtA
Before that :
https://www.youtube.com/watch?v=j2y-3zmoAn0
Now On Youtube :
https://www.youtube.com/channel/UC_Dpn-oorc8CMobK0IwGjHQ
Monday, April 20, 2015
Introduction to Scrum Agile Methodology
- Introduction to Agile Methodology (Agile Engine)


- Agile SCRUM process overview
- Basic SCRUM Vocabulary
- Implement Scrum in 10 easy steps:
Step #1: Get your backlog in order
Step #2: How to estimate your product backlog
Step #3: Sprint Planning/clarify requirements
Step #4: Sprint Planning/estimate tasks
Step #5: Create a collaborative workspace
Step #6: Sprint
Step #7: Stand up and be counted
Step #8: Track progress with a daily burndown chart
Step #9: Finish when you said you would
Step #10: Review, reflect, repeat….
EXTRA Materials for Agile Scrum :
https://www.youtube.com/watch?v=niVbODz4Dnw
EXTRA Materials for Agile Scrum :
https://www.youtube.com/watch?v=niVbODz4Dnw
Step by Step to Install and Configure TortoiseGIT and Clone a Project
Step 1 : First Download and Install TortoiseGIT.
Step 2 : Generate ssh keys (public and private keys) using git bash command line
Use following command to generate the ssh keys.
Step 3 : Then add generated public key to project git repository and build the secure linkage.
Step 4 : Then Create a Folder and convert that folder to a git folder.
Step 5 : Then open that folder and right click and select TortoiseGit -> Settings
Step 6 : Then from the popup window add the remote url and apply and clone the project to your git folder
Step 2 : Generate ssh keys (public and private keys) using git bash command line
Use following command to generate the ssh keys.
ssh-keygen -t rsa -C "your_email@example.com"Step 3 : Then add generated public key to project git repository and build the secure linkage.
Step 4 : Then Create a Folder and convert that folder to a git folder.
Step 5 : Then open that folder and right click and select TortoiseGit -> Settings
Step 6 : Then from the popup window add the remote url and apply and clone the project to your git folder
Wednesday, September 19, 2012
My First Hibernate Application
Step 1 :
Setup the Development Environment for Hibernate
1. Eclipse IDE
- using eclipse IDE create a Java Application project.
2. Hibernate distribution bundle
- download following .jar files and create folder called 'lib'
under project and copy and paste those .jar s to that folder
antlr-2.7.6.jar / commons-collections-3.1.jar / dom4j-1.6.1.jar
javassist-3.9.0.GA.jar / jta-1.1.jar / slf4j-api-1.5.8.jar
hibernate-jpa-2.0-api-1.0.0.Final.jar / slf4j-log4j12-1.5.8.jar
log4j-1.2.16.jar
3. Install MySQL Server and download mysql-connector-java-5.1.15-bin.jar
(JDBC driver) and copy and paste to lib folder
4. Configure Build-Path of the Project
go through build-path and add lib folder .jar files to
build path of the project
Step 2 :
Create MySQL Database tables
create two table called 'users' and 'tasks' in your MySQL Database as following,

Step 3 :
Create POJO (plain old java object) Classes
Under 'src' folder create package called 'com.test' and add following two classes.
1. User.java

2. Task.java
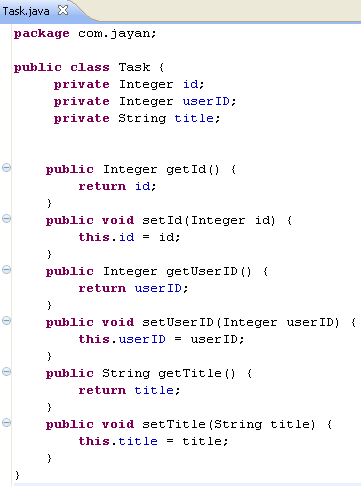
Step 4 :
Create Mapping Files
Under project 'src' folder, add following .xml mapping files
1. user.xml

2. task.xml

Step 5 :
Hibernate Configuration
Under project 'src' folder, add following .xml hibernate configuration file
# hibernate.xml


Step 6 :
Create Start-up Helper Class
Under com.jayan package create start-up helper class as following,
# Hibernate.java

Step 7 :
Create Test Class
Under com.jayan package create Test class as Main class as following,
# Test.java

Step 8 :
- Finally run the Test.java class and get the Output as following,

Wednesday, September 12, 2012
Create JAVA Web Service using Axis2
[i] Environment Setup :
1. JDK
2. Eclipse
3. Apache Tomcat
4. Axis2
Step 1 : Install JDK and Eclipse and setup Java Environment
in Eclipse.
Step 2 : Add Apache Tomcat as Follows,
Window > Preferences > Serever > Runtime Environments > Add

Step 3 : Add Axis2 as Follows,
Window >> Preferences >> Web Services >> Axis2 Preferences

Step 4 : Set Server and Run-time

[ii] Web Service Project Creation :
Step 1 : Create Dynamic Web Project

Step 2 : Click on Modify button in Configuration section in above
window and tick Axis2 web service and ok.

[iii] Web Service Class :
Step 1 : Create a Java Class within a package in Java SRC package
in web service project and add following code.
package com.jayan.ws;
public class HelloWorldWS {
public String serviceHello(String name) {
return "Hi !!! " + name;
}
}
Step 2 : Then right click on that class and go to web service
and select create web service and on popup window
then tick monitor the web service as follows,

Step 3 : Then go though that window using next button and ok
and finally run the project using Run on Server and
then get your web service as follows,

Step 4 : Then click on services and that will display your available
services

-- -- > That's all folks.... Again meet you with a web service client.
1. JDK
2. Eclipse
3. Apache Tomcat
4. Axis2
Step 1 : Install JDK and Eclipse and setup Java Environment
in Eclipse.
Step 2 : Add Apache Tomcat as Follows,
Window > Preferences > Serever > Runtime Environments > Add

Step 3 : Add Axis2 as Follows,
Window >> Preferences >> Web Services >> Axis2 Preferences

Step 4 : Set Server and Run-time

[ii] Web Service Project Creation :
Step 1 : Create Dynamic Web Project

Step 2 : Click on Modify button in Configuration section in above
window and tick Axis2 web service and ok.

[iii] Web Service Class :
Step 1 : Create a Java Class within a package in Java SRC package
in web service project and add following code.
package com.jayan.ws;
public class HelloWorldWS {
public String serviceHello(String name) {
return "Hi !!! " + name;
}
}
Step 2 : Then right click on that class and go to web service
and select create web service and on popup window
then tick monitor the web service as follows,

Step 3 : Then go though that window using next button and ok
and finally run the project using Run on Server and
then get your web service as follows,

Step 4 : Then click on services and that will display your available
services

-- -- > That's all folks.... Again meet you with a web service client.
Sunday, May 6, 2012
OpenCV Face Recognition using PCA technique
Step 1 : Download and Install OpenCV 2.1.0 .
OpenCV 2.1.0 installation on Visual Studio 2008 guide is here .
Step 2 : Start with a new C++ Console win32 Application project on Visual studio.
Then create a new NearestTest.cpp file within that project.
Step 3 : Then create a face database with using several images as follows,
Database folder ->


Step 4 : Mainly this app consisting with two parts,
1. Image Training Part -
first you have to train Face Images from train.txt
training images.
-> learn() method
2. Image Recognition Part -
then using test.txt testing images, recognize each
and every face through training images (facedata.xml).
-> recognize() method

- After doing training -> it will create facedata.xml with using PCA technique.
- Then using facedata.xml, recognition will be done.
Step 5 : Create the Project Folder Structure as follows and then download all the
coding stuffs from above and then add to NearestTest.cpp file.

Step 6 : After creating folder structure and .cpp file build the whole project.
1. first train the images--> facedata.xml will be generated.

2. then test the app using test images--> output is as follows,


Subscribe to:
Posts (Atom)